Custom motorcycle paint jobs are becoming more common nowadays, with more riders choosing to add the paint job themselves. Painting a motorcycle is a straightforward process. The only thing that takes time is the prep work and sanding. However, riders may prep the area they want to paint incorrectly and fail to achieve the desired smooth and shiny finish. Other times, the quality and consistency of the paint is incorrect.
In such cases, small bubbles may appear as you apply primer, paint, or clear coat. Even if you manage to apply the paint and clear coat correctly, dry and cure the paint according to the instructions, and achieve a professional glossy finish, paint bubbles may still appear soon after. Spilling automotive fluid, riding in the rain, or exposure to extreme temperatures can cause paint bubbles and blisters to form.
Though small, paint bubbles can ruin the entire paint job and your bike’s aesthetics. But rather than give up on your DIY paint project or hire a professional painter, try to follow the tips listed in this article to help avoid or remove this issue.
Table of Content
1. Causes of Motorcycle Paint Bubbles

A motorcycle can be painted with various pigments using several tools. However, whether you use a spray gun or a rattle can, paint bubbles can form due to the following reasons:
1.1 High Temperature
Motorcycle paint cans often list optimal temperature and humidity levels in the instructions for when to apply the paint. In hot weather, a crusty layer forms over the paint nozzle, keeping the solvent and paint vapors from getting through. This causes air bubbles to form as the paint is pushed through the nozzle, causing bubbles to form on the surface when the paint is applied.
1.2 Incompatible Material & Paint
Not all types of motorcycle paints can be applied to every part. You may need paint with a ceramic coating for the engine, heat-resistant paint for the exhaust, metallic paint for the frame and fairing, and enamel paint for the wheels. If you apply the wrong paint on the wrong material, it will not bond properly with the surface and cause bubbles to appear.
1.3 Applying Paint on Greasy or Rusty Surfaces
Most metal parts are either oily or rusty before you apply paint. Improperly cleaned parts can cause paint bubbles to form.
1.4 Applying the Color Coat Before the Primer Has Dried
Primer is not necessary when spray painting motorcycle parts. But to create a better finish, it is recommended that you prime the surface before applying paint. But if the primer has not fully dried when you add the color coat, then bubbles will appear.
1.5 Poor Chemical Bonding in Paint Layers
Spray paint is applied in multiple layers, and each layer must have at least 3-5 minutes to dry before another coat is sprayed. This gives the paint time to settle, bond with the surface, and bond with the paint coat. Poorly bonded paint coats can leave paint lines and result in bubbles.
1.6 Moisture on the Motorcycle
Before starting a paint job, many riders wash their bikes. Motorcycle parts are washed to clean the grease and dirt before spraying on the paint. However, if you do not wipe the entire motorbike until it dries completely, the moisture can mix with the spray paint and get trapped inside the paint layer. When the paint is left to dry or cure, the moisture cannot escape, building up pressure and bursting out, which forms bubbles.


1.7 Moisture in the Air
Applying motorcycle paint, when there is too much moisture in the air, can cause the paint to blister or bubble. Optimal humidity levels are mentioned on the paint cans. Moreover, you can check the humidity levels inside your garage or workspace with a hydrometer. You can also download altimeter and barometer apps on your phone.
1.8 Leaving the Paint in Warm Water for Too Long
Painters often immerse spray paint cans in warm water to lower the viscosity/thickness of the paint so it flows better and creates a smoother finish. However, if you leave the paint cans in warm water for too long, the paint will become runny and cause bubbles.
2. How to Prevent Motorcycle Paint Bubbles
You can prevent bubbles from forming on the motorcycle paint by following these tips:
- Sand the surface rigorously and wait for the primer/sealant, color coat, and clear coat to dry.
- After wet sanding, make sure to wait for the moisture on the coats to evaporate completely before applying polish and buffing the surface.
- If you are not using spray cans, make sure you get the right paint consistency by using the right amount of thinner.
3. Tips to Fix Motorcycle Paint Bubbles
Once you identify the cause of the paint bubbles, follow the methods listed below to remove them:
3.1 Improve Ventilation in the Room
Start with opening the windows and placing fans near the motorcycle to blow air outside. You can also move your painted motorcycle to the shed to ensure better airflow. Do not paint in direct sunlight or late in the evening.
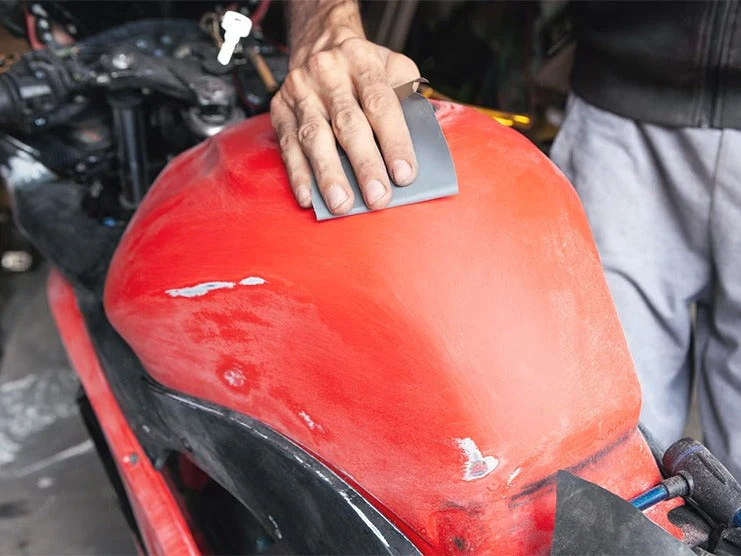
3.2 Sanding
Use 400, 600, and 800 grit sandpaper, alternating between dry and wet sanding to create a smooth surface. Once all the paint bubbles are removed, leave the parts to dry for 24 hours. Once dry, dust off the parts you want to paint, check the temperature and humidity levels in the room, then apply a color coat.
If you have one or two minor bubbles that are barely visible, then just sand out the bubbles. You can also cover the surrounding paint to protect it from being sanded. Just make sure the adhesive tape does not peel off the paint when it is removed.
Minor bubbles on the surface are usually trapped in the final clear coats. If you manage to sand them, you may remove some of that clear coat, exposing the good clear coat underneath and allowing you to polish it. If there is a bubble that is too deep, apply some paint on the area to fill the void and create a smooth finish.
3.3 Use Epoxy Fillers
If the paint bubbles cover a large area, apply epoxy fillers after sanding to create a smooth surface. Then re-apply the primer, paint, and clear coat.
3.4 Use Sealant
Using a sealant after applying fillers can help remove older paint bubbles and prevent new ones from forming. If you choose to apply sealant, skip applying the primer.
3.5 Repaint the Motorcycle Parts
Large-scale blistering can also be fixed by repeating all the painting steps. This time, make sure you are working in optimal weather, in a well-ventilated room, and using high-quality materials.
4. Takeaway
Paint bubbles are a common problem when customizing motorcycles that can be fixed using good-quality paint, working in optimal conditions, and preparing the surface adequately. If paint bubbles still occur, try to find the root cause before removing them. Ultimately, sanding, drying time, humidity, and temperature are the main factors that can ensure your desired results. So pay attention to them throughout the process to prevent bubbles from forming in the first place.
If you fail to do the paint job properly after trying the first few times, it is best to seek professional help.
Popular Collections


Leave a comment
All comments are moderated before being published.
This site is protected by hCaptcha and the hCaptcha Privacy Policy and Terms of Service apply.