Table of Content
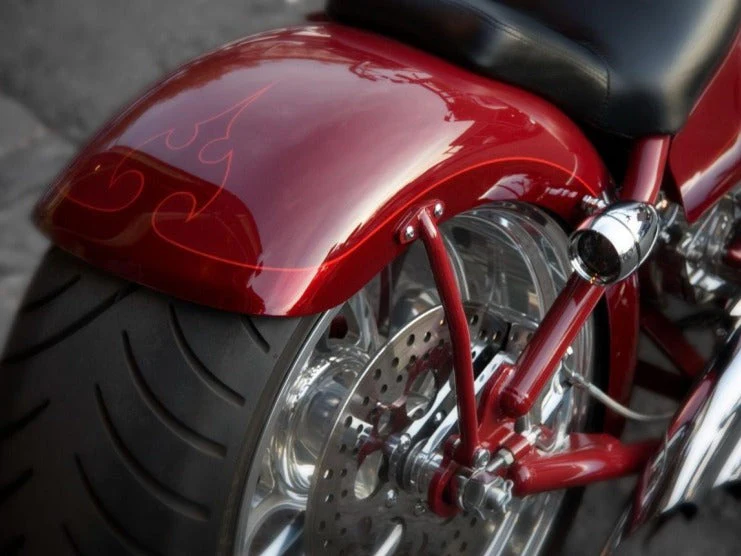
As a motorcycle enthusiast, you must learn how to paint a motorcycle and its parts. Painting a motorcycle can completely transform its look or make it look new if you are a skilled painter. Most motorcyclists love having a chrome finish on their motorcycles since it offers a vintage look. However, most modern motorcycles now come with a blacked-out or matte black finish. Most new motorcyclists are unsure whether they can paint chrome parts. Luckily, painting over chrome parts is completely doable if you use the right paint products and follow the correct procedure. Read this article to learn how to paint a chrome motorcycle fender.
Also Read: HOW TO PAINT A MOTORCYCLE GAS TANK
1. How to Paint a Chrome Motorcycle Fender
Painting a chrome motorcycle fender is similar to painting a motorcycle frame, gas tank, and plastic parts. However, there are only a few additional steps and products required to ensure the primer and paint coats stick to the chrome surface. You can easily paint a chrome fender by yourself. However, you will need to learn the complete step-by-step procedure first.
1.1 Equipment Required to Paint a Chrome Motorcycle Fender
The equipment required to paint a chrome fender includes:
- Respirator
- Gloves
- Long clothes
- Sanding machine
- Sandpaper
- Acetone
- Microfiber cloth
- Tack cloth
- Glazing and spot putty/body filler
- Epoxy primer
- Spray paint
- Clear glamor spray
1.2 Remove the Chrome Fender

If you want to learn how to paint an entire motorcycle or a specific part, you must first know how to remove each part or disassemble the entire motorcycle. In this instance, you must remove the chrome fender without scratching it.
1.3 Clean the Chrome Fender
Using a microfiber or a tack cloth, wipe off any dust on the fender’s surfaces. Make sure the surface is spotless to ensure a better finish.
1.4 Sand the Chrome Fender

Put on a mask and gloves before you start sanding. Using an air sander, sand the chrome fender. Sanding the chrome fender gives it a rough surface and removes high spots to ensure the primer sticks to the surface. The air sander can save a lot of time and effort as it provides more coverage and works efficiently. However, to sand the areas that are difficult to reach, use sandpaper. Use a 100-grit sandpaper to sand the chrome fender
1.5 Clean the Chrome Fender Using Acetone
Make sure to put on a respirator before using acetone. Take a piece of tack cloth and pour some acetone on it. Remove dust on the fender’s surface by wiping it down with the tack cloth.
1.6 Fill the Pinholes
Using glazing and spot putty, fill the pinholes. Take a plastic plate and pour some glazing and spot putty on it to ensure a better mix. Use a plastic blade scrapper to mix it well. Apply the spot putty on the chrome fender using the scrapper. Make sure to create a smooth surface using the scrapper. Do not overuse the spot putty as it will make it difficult for you to sand thick spot putty layers.
1.7 Sand the Spot Putty
Using 80 grit sandpaper, sand the spot putty on the fender until the surface becomes smooth. Sand the surface again using 120 grit sandpaper until you see all the low spots, pinholes, and imperfections are covered with smoothed spot putty. Sand it again using a sanding block with a 120-grit sandpaper on it to smooth the edges and curves.
Also Read: HOW TO PAINT A MOTORCYCLE FRAME


1.8 Remove Dust Using a Microfiber Cloth
Before applying epoxy primer, clean the fender and remove all the dust from every corner.
1.9 Preparation
Spray paints, epoxy primer, and clear glamor can have harmful chemicals that can harm your skin or lungs if inhaled. Wear long clothes that fully cover your skin, a respirator, and gloves when painting a motorcycle fender.
If you plan to paint the motorcycle fender at home, prepare a workspace. Cover the floor and walls with plastic sheets. You can also install a railing where you can hang and paint the motorcycle parts.
1.10 Apply Epoxy Primer
Sprayepoxy primer on the fender. Epoxy primer is best suited for painting metallic parts. If you want to paint plastic chrome parts, use a plastic primer. Make sure you are wearing gloves and a respirator before applying a primer coat.
Make sure to shake the epoxy primer spray can well before using. Remove the cap on top of the cap and install it at the bottom of the spray can. This will mix the two chemicals, including the primer and hardener. Shake it again for two minutes after you press the cap on the bottom. If you need further help, read the instructions on the spray can.
Apply three coats of epoxy primer on the fender and wait 5-10 minutes between applying each coat to let them dry. Do not spray too much on the same spot. Move your hand in a uniform motion to avoid run-on primer layers. After applying three primer coats, wait 30-45 minutes to let it dry.
1.11 Apply Paint
Apply at least three coats of high-quality spray paint on the fender while taking 10 minutes between coats to let them dry. Make sure to spray the paint on evenly to ensure there are no high spots or run-on layers. Any mistakes will require you to start over from scratch.
1.12 Apply Clear Coat
The clear coat spray can has two unmixed chemicals. Remove the activator from the cap and install it on the bottom of the can. Shake the can for two minutes to mix the chemicals in the spray can. You should find instructions on the spray can. Before applying the clear coat, make sure to wipe off any dust on the fender to ensure a glossy look.
2. Frequently Asked Questions (FAQS)
2.1 Can You Paint Directly Onto Chrome?
No, you cannot paint directly onto chrome. You must first prepare the surface to ensure the primer and paint stick. You can prepare the chrome surface by sanding it with an air sander and then using a 100-grit sandpaper. Sanding the motorcycle part ensures that the lustrous chrome is removed before you apply the primer. Make sure to use an epoxy primer that is compatible with chrome.
2.2 How Many Coats of Primer Do You Need to Paint a Chrome Motorcycle Fender?
Typically, two to three coats of primer are enough to ensure the paint will stick to the chrome surface. However, before applying the primer coat, make sure that the previous paint is removed.
Also Read: HOW TO PAINT PLASTIC MOTORCYCLE PARTS
3. Takeaway
Painting a chrome motorcycle fender is similar to painting other motorcycle parts. However, it is important to use the right paint products to ensure the paint sticks r to the surface. For a chrome fender, use epoxy primer compatible with chrome. Also, make sure to sand the chrome properly before applying a coat of primer. You can completely transform the look of your motorcycle by painting the chrome fenders since most modern motorcycles come with a blacked-out or matte black finish.
Painting motorcycle parts can give it a custom look. If you also want to improve your riding experience, Viking Bags offers good-quality aftermarket parts, including handlebars, seats, backrests, sissy bars, fairings, and crash bars. You can also carry more stuff on a motorcycle tour by installing saddlebags, sissy bar bags, and motorcycle trunk bags.
Popular Collections


Leave a comment
All comments are moderated before being published.
This site is protected by hCaptcha and the hCaptcha Privacy Policy and Terms of Service apply.